Hi Readers, in this blogpost i am sharing steps to follow in order to resolve local listener issue (unable to connect to db through local physical node ip as no services showing reg. in local listener ) in a 2 NODE RAC setup.
User was complaining of below error while using dblink (which was using physical node ip/local listener for connection) – ORA-12514: TNS:listener does not currently know of service requested in connect descriptor
Connections through scan ip was working fine, and connections to 2nd cluster node also worked fine. But no services showing registered in 1st node local listener as shown below . ALTER SYSTEM REGISTER from sqlplus also didnt fix issue.
On checking local listener parameter – it is set to vips of both nodes as in an ideal RAC env.
Let us check VIP stats from crsctl if they are both online –
as shown below VIP is in intermediate state.
we need to shutdown and start vip from oracle user.
srvctl stop vip -vip drpadb01
check vip is offline now.
start vip – srvctl start vip -vip drpadb01
check status now of both vips –
now let us check service status in local listener. db services registered now with listener.
Hi Readers, in this blogpost i am sharing steps to fix DR (standby database) sync issue due to below error –
Error –
2023-04-17T07:41:29.364469+05:30 Errors in file /u02/app/oracle/diag/rdbms/drpstgdb/PSTMDB/trace/PSTGDB_pr0q_15533286.trc: ORA-01115: IO error reading block from file 173 (block # 3383745) ORA-01110: data file 173: ‘+DATA/DRPSTMDB/ED6970942CDE017CE0530A3A03A112D3/DATAFILE/user.758.1126160105’ ORA-15055: unable to connect to ASM instance ORA-15055: unable to connect to ASM instance ORA-00020: maximum number of processes (120) exceeded
SYNC status –
set lines 250 pages 250 col HOST_NAME for a15 col DB_Start_Time for a20 alter session set nls_date_format=’DD-MON-YYYY HH24:MI:SS’; SELECT NAME as DB_NAME,instance_name,OPEN_MODE,HOST_NAME,PROTECTION_MODE,database_role,logins,to_char(startup_time,’DD-MON-YYYY HH24:MI’) DB_Start_Time FROM gV$INSTANCE,v$database; select sysdate from dual; select primary.thread#, primary.maxsequence primaryseq, standby.maxsequence standbyseq, primary.maxsequence – standby.maxsequence gap from ( select thread#, max(sequence#) maxsequence from v$archived_log where archived = ‘YES’ and resetlogs_change# = ( select d.resetlogs_change# from v$database d ) group by thread# order by thread# ) primary, ( select thread#, max(sequence#) maxsequence from v$archived_log where applied = ‘YES’ and resetlogs_change# = ( select d.resetlogs_change# from v$database d ) group by thread# order by thread# ) standby where primary.thread# = standby.thread#; !date
CHECK TRANSPORT AND APPLY LAG –
query –
col name for a30 col value for a30 select NAME Name, VALUE Value, UNIT Unit from v$dataguard_stats union select null,null,’ ‘ from dual union select null,null,’Time Computed: ‘||MIN(TIME_COMPUTED) from v$dataguard_stats;
Here transport lag is 0 and apply lag is 21 Hrs, so issue is local to standby db system.
STOP/start of MRP did not help. and MRP was terminating due to below error –
Background Media Recovery process shutdown (PSTGDB) 2023-04-17T08:29:27.666756+05:30 Shutting down ORACLE instance (abort) (OS id: 59900504) 2023-04-17T08:29:27.668536+05:30 Shutdown is initiated by oraagent.bin@ (TNS V1-V3). License high water mark = 104
solution –
We need to check max process utilisation of asm instance and increase process limit.
select * from v$resource_limit where RESOURCE_NAME = ‘processes’;
STOP MRP APPLY –
SQL> ALTER DATABASE RECOVER MANAGED STANDBY DATABASE CANCEL;
Database altered.
STOP DATABASE –
bash-4.4$ srvctl stop database -d DRPSTMDB
login as grid user – login to sqlplus as sysasm (not sysdba to change asm paramters).
alter system set processes=360 scope=spfile;
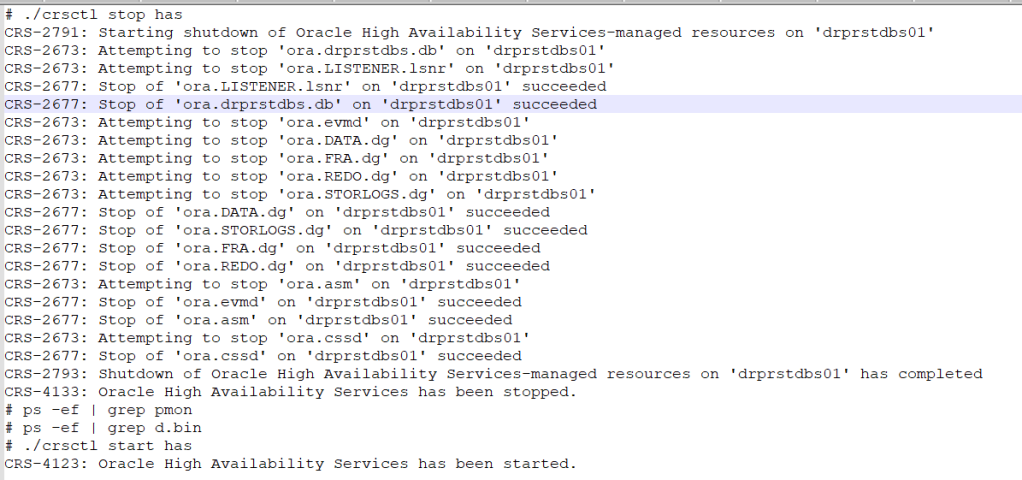
stop start crs/asm instance
verify process change post startup –
start the db instance and start MRP process.
srvctl start database -d DRPSTMDB -o “read only” (as this is an active dataguard standby open for read-only queries).
DGMGRL> EDIT DATABASE drpstmdb SET STATE=’APPLY-ON’; Succeeded.
check gap after sometime. Issue resolved now as gap has reduced.
Hi Readers, in this blogpost i am sharing steps of how you can export a table from a 19c PDB database to a 12.1 PDB database where source schema,table name and tablespace name will be re-mapped at target. Also, we will use advanced compression while taking export backup.
PFB SUMMARY OF SOURCE AND TARGET –
SOURCE PDB DETAILS –
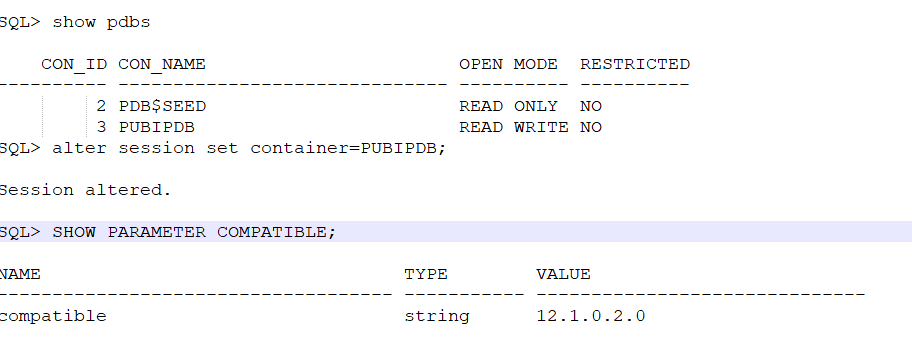
CHECK TARGET PDB COMPATIBLE –
if compatible is not same then higher db version export backups cannot be imported into lower db version and below error is observed. However you can export from lower to higher without setting any version during bkp.
2. check source table size AND tablespace-
SELECT SEGMENT_NAME,OWNER,ROUND(BYTES/1024/1024/1024,2) GB,SEGMENT_TYPE,TABLESPACE_NAME FROM DBA_SEGMENTS WHERE SEGMENT_NAME IN (‘S_ORDER’)
If source table has indexes also, then remap index tablespaces as well if same name tablespaces not available at target.
for PDBs export/import create a pdb service entry in tns files and use same to connect to pdb.
service can be created as follows-
3. Now lets take the export backup. As table size is large we will use compression for both data and metadata (compress=all) to reduce dumpfile size (use only if you have advanced compression license ). exclude statistics of table and gather stats at target once import is complete (stats import otherwise take considerable time so this is better option).
Also use parallel option if using enterprise edition to reduce backup time. (as per available cpu and free memory).
Always use a parfile as it can be reused if any error occurs –
run expdp in background as – nohup expdp parfile=exp.par &
import logs –
Export: Release 19.0.0.0.0 – Production on Wed Apr 12 10:07:32 2023 Version 19.17.0.0.0
Copyright (c) 1982, 2019, Oracle and/or its affiliates. All rights reserved. ;;; Connected to: Oracle Database 19c Enterprise Edition Release 19.0.0.0.0 – Production ;;; **** ;;; Parfile values: ;;; parfile: exclude=STATISTICS ;;; parfile: version=12.1 ;;; parfile: compression=all
SCP the dumpfiles to target machine backup mountpoint (where datapump) directory is also created).
3. Check target schema default tablespace and related tablespace free space. atleast 20% extra space should be available as incase of import, table size may increase/decrease depending on datatype and db version and compression settings. In our case we added space to make free space upto 600 GB. if you dont want import to fail due to space issue then set resumable timeout parameter at target ( in seconds), so imp will wait till space is added. ALTER SYSTEM SET RESUMABLE_TIMEOUT=1800;
4. Now let us import the table using parfile. – nohup impdp parfile=imp.par &
Hi Readers, in this blogpost i am sharing steps on how you can change redologs and controlfiles location post db creation if they have been placed mistakenly in wrong diskgroup or redo log size is not as per requirement.
In my case, we had selected recovery area as +FRA diskgroup and dbca created redologs in DB create file dest DATA and FRA in typical installation mode , as it does not ask specifically for redologs location in this creation mode.
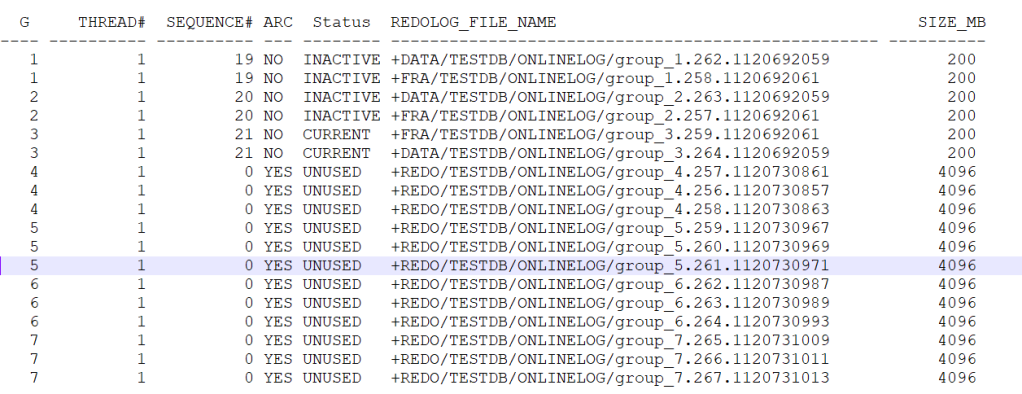
REDOLOGS location and size post installation –
column REDOLOG_FILE_NAME format a50; set lines 1000 SELECT a.GROUP#, a.THREAD#, a.SEQUENCE#, a.ARCHIVED, a.STATUS, b.MEMBER AS REDOLOG_FILE_NAME, (a.BYTES/1024/1024) AS SIZE_MB FROM v$log a JOIN v$logfile b ON a.Group#=b.Group# ORDER BY a.GROUP#;
So in order to drop these small sized redo logs in FRA and REDO and re-create with 4GB size in REDO diskgroup, i had performed following steps –
Add new groups 3 members and 4 GB each size. ensure diskgroup has sufficient space before creation.
Now we have old group with 2 members and 200 MB size and newly created groups with 3 members and 4GB each size.
for dropping old redolog groups make them inactive by switching logfiles and then drop them.
FINAL EXPECTED RESULT –
Similarly lets check how to move controlfiles location to different diskgroup –
current location –
create a pfile from spfile and save the original pfile, perform edits in a new pfile to avoid any issues due to wrong edit.
now shutdown the database
edit controlfile values as below in pfile
login as grid user and login to asmcmd
GO TO REDO DISKGROUP AND CREATE CONTROLFILE DIRECTORY TO PLACE THE CONTROLFILE FROM FRA DISKGROUP
You may encounter below error if you try to copy with same filename. so we will rename the controlfile.
so copy with new file name as follows –
delete the old FRA controlfile (you may perform this step later after testing db startup).
ASMCMD> rm Current.256.1120692059
new controlfile will now show as follows –
ASMCMD> cd +REDO/TESTDB/CONTROLFILE ASMCMD> ls -lrt WARNING: option ‘r’ is deprecated for ‘ls’ please use ‘reverse’
Type Redund Striped Time Sys Name CONTROLFILE UNPROT FINE NOV 14 11:00:00 N control02.ctl => +REDO/ASM/CONTROLFILE/control02.ctl.268.1120736603
similarly to maintain uniformity in controlfile naming I have renamed DATAdiskgroup controlfile as follows –
ASMCMD> cd +DATA/TESTDB/CONTROLFILE ASMCMD> ls -lrt WARNING: option ‘r’ is deprecated for ‘ls’ please use ‘reverse’
Type Redund Striped Time Sys Name CONTROLFILE UNPROT FINE NOV 14 11:00:00 Y Current.261.1120692059 ASMCMD> cp Current.261.1120692059 control01.ctl copying +DATA/TESTDB/CONTROLFILE/Current.261.1120692059 -> +DATA/TESTDB/CONTROLFILE/control01.ctl ASMCMD> ls -lrt WARNING: option ‘r’ is deprecated for ‘ls’ please use ‘reverse’
Type Redund Striped Time Sys Name CONTROLFILE UNPROT FINE NOV 14 11:00:00 Y Current.261.1120692059 CONTROLFILE UNPROT FINE NOV 14 11:00:00 N control01.ctl => +DATA/ASM/CONTROLFILE/control01.ctl.264.1120736683 ASMCMD> rm Current.261.1120692059
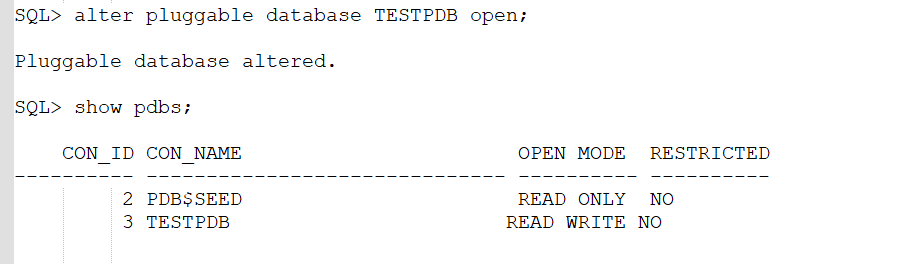
Now startup database with pfile and create a spfile from it.
now perform final startup.if database opens without errors and location is as expected then you are good to go.